

As a close for the year/as a start to the year, I thought I might discuss a successful mini PBL (project based learning) I tried out before the winter break began! My students have just about finished chemistry and I thought it might be fun to have the students come up with the review game for a change! Below you will find a summary of the week(ish) long project as well as some examples of what they created!
PBL’s are a great way to get your students engaged in an over-arching topic. I received training on using PBL’s in the classroom last year through the Buck Institute for Education. Although a typical PBL should be at least 6 weeks long, I tend to do shorter PBL’s (about a week or a week and a half) as they work better for me and my classroom.
I told my students on the first day that the table groups they were sitting in now served as their new gaming start-ups and their task was to create an educational chemistry game. At the end, “investors” would come in and one group would be selected as the game that the investors would like to produce and sell. The winning team won classroom tickets for our class drawings (a coveted prize).
DAY 1- (teacher lead)
In preparation for the project, I assigned homework the night before we began to do a write-up on their favorite game to play and a description of why. To start things off, they shared their favorite games with the people at their table groups. Once everyone had gone, we discussed the games as a class. We determined common themes among the games that were favorites among the students (such as cooperative, competitive, hands-on, imagination based, entertainment vs. educational, etc). Groups then randomly picked a chemistry topic that their games would use as a central theme. Once groups and topics were assigned, I handed out a sheet giving guidelines on brainstorming. Students first silently brainstormed on their own for 5 minutes. Then, students were to share their brainstorming with their group and then brainstorm together for another 5 minutes. Following the brainstorming session, students were to discuss the ideas they had. Finally, after thoughtful deliberation, they were to choose what their game would be.
DAYS 2-6 (student lead)
Once student groups had determined what their game would be, they were given class-time over the period of a week to design and build their games. I was a little worried that students would get off topic during class or that they would not have enough to do. I was so wrong! Since they had picked and designed their own games, they were totally invested in working on them; autonomy often leads to students being more focused and successful in school– this project is a prime example of this. During these days, I mainly observed my students as they worked. I did not go up and talk to groups unless they signaled that they needed my (I used the colored red/yellow/green cups that I discussed in this post), as I did not want to interrupt their train of thought, etc. Of course, I became involved if they were off task or if they needed a mediator. However, other than that, I really served as a consultant for their games in the event that they needed some help problem solving something.
GAME REQUIREMENTS:
During their solo work time, groups were given a set of requirements in which to meet for their game to be considered ready to “invest in”. All games needed to be designed for 4-6 players (the size of my table groups) as well as include: typed up instructions that fully explain the game (including set-up), and all games also needed to be housed in a box. All boxes needed to be sectioned off inside to organize the pieces, the outside needed to include the name of the game, the gaming company, a barcode and price, a description of the game, a fun picture that helps to depict the game and colors (all of these criteria were decided by the students themselves on a discussion the second day; so, again, there was buy-in with students wanting to meet these requirements).
DAY 7 (teacher lead):
The final day! Before students came in (mine always line up outside my classroom in two lines, the straighter line goes in first), they were told that once they entered the classroom, they had only 3 minutes to get their game set up at their table. Students hurried to get their games laid out, set up properly and ready for the “investors” to play. The students actually were the ones who became the investors for the other “game companies”. At each table, I laid out a packet of investor feedback sheets (rubrics) that were based upon the criteria we came up with as a class. I set a timer, and each group got 8 minutes to play each game. Groups rotated around the room, played the games and filled out the feedback form for each of the game companies (as well as filled it out for themselves after they had played everyone else’s games). At the end, we had a couple of minutes for the “investors” to vote on their favorite game after the “companies” got a minute to review their feedback. I was whole-heartedly impressed with the feedback the students gave to one another. Their expanded feedback was thoughtful as well as helpful. They gave great suggestions for improving the games. They were both fair and tough at the same time; they had great perspective for assessing their peers since they had gone through the same process and had high expectations.
REFLECTION:
This project was not only fun fro my students, but also for me. I was so impressed with what they were able to come up with! The games were incredibly creative and served as a wonderful platform for them to review/study for the upcoming test. Aside from the obvious chemistry lessons embedded in this project, there were many other life lessons that were threaded throughout the experience such as: situational problem solving, managing group structure, leadership, creativity, compromise, listening skills, collaboration and much more! Surprisingly, I only had two problems arise within groups that I needed to get involved with (out of 36 groups total!). Both of the problems were minor and more about hurt feelings that needed to be expressed with an adult mediator present. Other than that, it went smoothly and was a success! I am looking forward to doing this project again next year!
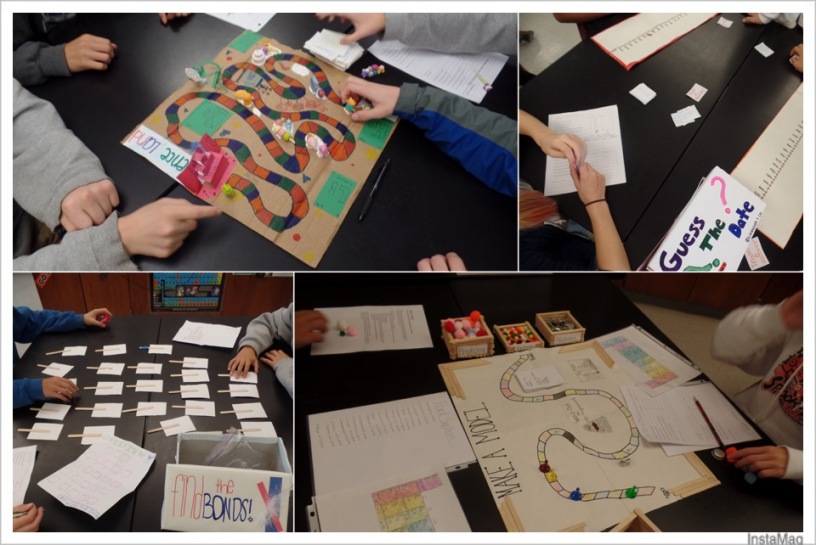
Below are some examples of games that my students created. I hope you enjoy them and, perhaps, are inspired to do something similar in your own classroom!
-The Ardent Teacher

Students created a chemistry game based on the popular game “Candyland”.

This game was based on the “Hunger Games” in which players raced to the center arena by correctly answering questions and then knocked one another out by continuing to get answers right. If you look closely, you can see that the playing pieces are various scientists attributed with the atomic theory!!

I loved that this game was about chemical bonding and the students chose a James Bond/007 theme!

This game was about chemical reactions and based upon the classic game of “memory”. Students would flip cards over to determine of a chemical reaction could occur while trying to remember where various cards were. This was one of the chosen winners!

This game was quite unique. Students were working in teams of two and were given a blank timeline. Teams were allowed a specific amount of time and had to correctly place informational cards in order on the timeline based on historical events and discoveries regarding the Atom as they occured.

This game was all about using the periodic table to predict reactions between elements. As you can see, the students recreated the periodic table and made it into a game board on which playing pieces moved. Students answered questions to move through the board and make it to the end in order to win.

The goal of this game was to be the first to make it to the center of the Atom’s nucleus through playing various types of cards! The race was intense and fast-paced!

The “Make a Model” game was just as the name suggests: students were to make an Atomic model! This group made the boxes containing the pieces as well as re-creating the periodic table as a reference sheet to use. It’s no surprise that this game was voted as one of the favorites!


Hi! I just wanted to let you know how much I enjoy your blog. I’m in a bit of a strange situation — I’m endorsed in English and History — but I’m also currently teaching Science. Your site (and your TPT store!) have been enormously helpful as I plod my way through Chemistry. So, thanks for the inspiration! Your blog has become a regular read for me!
LikeLike
Hi Kelsey! Wow, thank you SO much for your kind words. I cannot express how happy it makes me to know that I am helping another teacher out. I’m sure it’s been difficult for you being thrown into teaching Science when you have a different background. I will say that I love integrating history and english into my classes; so, it would probably be fun for you to do that as well! When I teach Chemistry, I typically go into the history of the Atomic Theory and the various scientists involved. It’s fun for the students to make the connection between the dark ages and the large gap in what scientists were able to learn about the Atom. I would also suggest that you really take advantage of having your students write lab reports (mine basically write essays each time they complete a lab) to help get your English fix! Hmmm this is giving me a good idea for a future post! Feel free to pose any questions you have! Im happy to help! Anyway, thanks for the comment– it made my night : )
LikeLike
I’m so glad my comment made your day! :) And thank you so much for the offer of assistance! I’ve definitely integrated English and History into the class. My 7th graders got a huge kick out of Alchemy, particularly when I pointed out that Nicholas Flamel, the character from Harry Potter, was actually named after a real life alchemist. :) What sort of a lab do you tend to do for chemical reactions? I’m thinking about lighting a piece of paper on fire to show oxidation, but I’d love for them to be able to experiment with that a bit. :) Suggestions? Feel free to e-mail me if it’s easier for you. It should be listed in the comment, but if not just let me know, and I’ll include it on my next comment.
LikeLike
I love the Nicholas Flamel connection! I have a fun video I like to share with professor McGonagall about the conservation of mass (https://www.youtube.com/watch?v=3TsTOnNmkf8). I have a few labs that I like to do with chemistry. An easy one is with alka seltzer tablets (I actually just posted that one in my store). If you have access to science equipment and supplies, lighting magnesium on fire is always a fun one (just practice safety– its very very bright and can be damaging if stared at). There is another fun one with calcium chloride that I am trying to also post in my store soon. I guess my suggestions would depend on your comfort level in a lab setting. Chemistry can be scary, especially if it’s not something that you normally teach. If you are uncomfortable with more “intense” labs, I would stick to labs that involve regular household items (vinegar + baking soda etc). There are also some fun demos that you can do too (like this colored flame set: http://www.sciencecompany.com/Flame-Test-Chemical-Kit-With-Five-Chemicals-P16517.aspx). I hope this was helpful!
LikeLike
It’s going to be pretty cool to make
LikeLiked by 1 person
I hope you try it, it’s a really fun way to review content with students :)
LikeLike
3 years late I know but I love your PBL idea.
LikeLiked by 1 person
Thank you!
LikeLike